Wednesday, September 30, 2009

MUFE & Nars

I couldn't believe it when I saw a post from Sammiebbz saying that MUFE is now available in a shop in London AND online http://makeupx3.blogspot.com/2009/09/mufe-in-uk.html. Yah!

If you fancy getting your hands on some MUFE products, the website address is http://www.makeup-provisions.com/.
I haven't had access to it in the past so I was really excited to see what they had in stock. They have a range of MUFE products but they don't have every shade/colour. Apparently you can email them and ask if there's something in particular you're after so that's handy! The excitement got the better of me and I placed an order with them last night for the Mat Velvet + Foundation and Full Cover concealer (which I've heard is amazing for covering up dark undereye circles).I've heard alot of people rave about the HD foundation but I tried a sample of it and the coverage wasn't great for me and I suspect it was the cause of a breakout I had at that time. It also didn't last very long so I wanted to try one that would help mattify my skin (I don't have oily skin but my T-Zone does get quite shiny during the day). The Full Cover concealer is supposed to be great for covering up blemishes too.

I was in the mood to try out different foundations so I also went onto the Nars site and ordered the new Sheer Glow Foundation that everyone seems to love at the moment. Whenever I see the word 'sheer' I always assume it will have rubbish coverage but it does say it's buildable and I have seen a couple of Lollipop26 vids on YouTube about this product and she loved it. She also likes the Revlon Colourstay foundation which is a fave of mine so I'm really looking forward to finding out if it will suit my needs. I also ordered the infamous Albatross Highlighting powder. I have wanted this product for sooooo long and it's always been on my lust list so I am really chuffed that I finally got around to getting it.

So you can expect reviews on all of these products over the next couple of weeks! So...out of interest, what product has been on your lust list for far too long?

Tuesday, September 29, 2009

Good Times/Bad Times

1) I had quite a big shopping spree yesterday and got some lovely clothes which include a matte sequin blazer from Warehouse and a gorgeous butterfly print dress from Dorothy Perkins (I am impressed at the new brands they now have) but I will post some pics of these sometime this week. I've still got to get that Dune bag I posted about too...

2) Whilst shopping I had a really good look through the new Fusion range at Monsoon and I could have bought the whole lot!There's some really amazing military inspired tops with a sequin twist on the shoulder pad trend, bright winter coats and amazing statement dresses...check it out!

3) My skin has been in amazing condition this past week, I'm putting it down to my most recent skin regime which is Neutrogena Visibly Clear 2 in 1 Face Wash/Mask, Liz Earle Cleanse & Polish, Korres Olive & Rye eye cream and Forever Living Aloe Propolis Cream. I love that moisturiser! I have also used the Nude Miracle Mask twice this past week to pep up my skin.

4) I actually managed to hold myself back when it came to makeup purchases this week...which is virtually unheard of!

5) ELF Mineral eyeshadow in Natural has been my best friend this past week (I have worn it three days in a row!). It's just the perfect daytime all over lid colour with a gorgeous sheen to it.

1) I have heard that there was a bit of a controversial debate on twitter last night about bloggers getting alot of products for free to review. I was apparently mentioned and I am quite upset about that since I put alot of time and effort into my blog and at the end of the day, you can't buy back time. Some people may not like the fact that I get free stuff but I'd like to know if they're giving the same abuse to magazine beauty editors since they don't buy anything they test and get everything for free? All I'm saying is, if you don't like it, don't read my blog. I'm not out to con anyone and I'm always honest in my reviews. And to everyone else who has shown support for me, thanks for keeping this little beauty blogger's world a positive place.
2) I woke up today with 4 bite marks from some little creature (I'm assuming it was a mosquito type fly or midgie)...but I now have huge lumps on my back, leg and one on my neck! Yuck!

Monday, September 28, 2009

Mini (very controlled) binge

I took a wee trip into town today to have a mosey around the shops. I ended up getting quite a few bits and pieces but most of it was clothes, which I will post about later in the week...there's so much nice stuff around at the moment, I'm loving ll the autumn/winter collections!

For once in my life I managed not to go ga ga with makeup purchases (although I replaced that with a clothes binge). It's very unlike me but I stuck to what I intended on buying which was three things...my much talked about soft skin must have, L'Occitane Almond Shower Oil which is just dreamy, a lipstick I have wanted for aggggeesss but kept forgrtting to buy...YSL Rouge Pure Shine in no.32 (Frozen Mango) and the much blogged about Loreal Double Extension Mascara/Cils Booster. This is a mascara that Kandee The Makeup Artist swears by too so I'm excited to try it out.I haven't been disappointed by the YSL lipstick...it's light, moisturising and the colour is so wearable and gorgeous (check out the swatch below). I love it! I originally wanted the peach coloured Rouge Volupte but when I swatched it in Boots, it looked too dark for me. I will be testing out the mascara tomorrow and will let you all know my thoughts on it.
Have you guys managed to stick to your guns with regards to a makeup shopping list?

Saturday, September 26, 2009

Nude Skincare

I first heard about Nude Skincare from Aleksis a.k.a. Alpha Blonde when she raved about their Advanced Eye Complex and Miracle Mask on YouTube. I was really intrigued by the brand so I had a look at their website and contacted them to find out more. As you know, I'm big on natural skincare so when they offered to send me the two products to try for my blog, I jumped at the chance.

First off, the Advanced Eye Complex is described on the website as "The definitive treatment for younger looking eyes, instantly. Purest acacia extract delivers an immediate, dramatic lifting effect. Probiotics prime and protect while proven bioactive CoQ10, milk peptides and mountain ash smooth wrinkles, reduce puffiness and dark circles and deliver a dramatic lifting effect".

The packaging is really simple as you can see but the best thing about it is that it's practical, which is what you want from skincare. The pump on the eye complex only ever dispenses as much as you need, which is great coz I hate wasting the product. You only need a really small amount to cover the eye area as the consistency is quite thin. It immediately tightens up the eye area and takes away any puffiness. I have been using it for a couple of weeks now and I have noticed a marked improvement in my dark circles. I really like this eye cream and it does what it says on the tin.

Just to give you an idea of what the products look like, the Advanced Eye Complex is on the left above and the Miracle Mask is on the right.

The website describes the Miracle Mask as having "Natural milk AHAs and mandarin extract actively exfoliate while red ginseng stimulates circulation for visibly radiant, smooth skin".

The mask is a thinner consistency than what I'm used to but it means you don't have to use as much as it spreads over the face really easily. I applied it all over my cleansed face, left it on for 10 minutes and then wiped it away with a damp muslin cloth. My skin felt super smooth after using this and it had a real glow and radiance. This would be fantastic for a pick me up or to use just before a night out or special occasion because it really refreshes the skin. It really refined the texture of my skin too. I love this mask.

Out of the two, I would say my favourite is the Eye Complex simply because I have my pesky dark circels to combat and this product really seems to be making a difference the more I use it. They are both really high quality products!

What is your favourite skin pick me up?

Friday, September 25, 2009

Miracle Worker for Lips!

I was sent some products from the lovely people at SpaceNK and I couldn't contain my excitement when I pulled a little square pink box out of the parcel. I read the name By Terry and a huge smile broke out on my face. It was the By Terry Baume De Rose! This is the product that Lollipop26 has continuously raved about in her posts and in her YouTube videos. I don't have access to this brand in Scotland so I was so so so excited to be able to try this product.

It's basically a super moisturising, soothing, repairing lip balm made with highly concentrated Rose Wax and lipids. I remember seeing Lollipop26's reviews on it and I remember thinking...hmmm, £30 for a lip balm? That's just a bit excessive! I would never have dreamt of spending that much on that type of product.

So what did I think of it?....First off, I love the smell (it's rose scented) and I also love the frosted glass packaging with silver lid embossed with the By Terry logo, which is simply but expensive looking (well, you would hope so, wouldn't you!). I love the fact that the balm is a milky Baby Pink colour too. On first application of the balm, it felt so smooth and you only need a very small amount, it just glides on your lips. It leaves a lovely light milky pink colour on the lips and it just makes them look so plump and healthy. I can categorically say that it feels so gorgeous to wear! It lasted a long time on my lips and I have to say that my dry, chapped lips were healed within 24 hours of wearing it! I was absolutely astounded at how nourishing and moisturising this lip balm is. I applied the balm a total of 3 times in the 24 hour period (including applying it before bed) and it COMPLETELY eradicated any dryness or flakiness. My lips feel incredibly smooth.

This is, without doubt, the best lip balm I have ever tried and I have been so amazed by the results. I would have NEVER ever paid £30 for a lip balm before but I know now that I couldn't get through the winter without this lip balm, it's now become in my top 5 of must have products. If you get it, I can guarantee you won't be disappointed. All I can say is..WOW.

Another Use for Illamasqua Powdered Metal

I just wanted to let you in on an idea I had for another use for the Powdered Metal I bought from Illamasqua. As you know, I got Thalia, which is a gorgeous bronzey colour. I was thinking about what I'm going to wear on Saturday for a girl's night out (yes, I think THAT far ahead.ha ha.) and I decided to wear a lovely new dress I have. Since it's relatively short and I will be getting my pins out, I thought I better put a bit of extra effort into them.
I always like to apply a glistening lotion to my legs to get that sheeny look down the shinbone (it's very slimming too!). I had a brainwave to use the Thalia Powdered Metal Mixed with moisturiser and you can see from the pic that it worked a treat! I only mixed a really really small amount with a light moisturiser on my arm and it created a really gorgeous bronzey sheen. It is more concentrated in the pic coz I mixed it on my arm and needed to make it darker to show up on the cam, it wouldn't be that dark on my legs as that amount would be spread out and blended into my legs.

What do you do to get your legs looking good?

Thursday, September 24, 2009

FOTD using new Illamasqua products

I was asked to do a FOTD with my new Illamasqua products I bought so here goes...(excuse the hair, I didn't have time to do anything with it)

Face: MAC Strobe Liquid, Revlon Colourstay in True Beige, Korres Wild Rose Concealer in WRC2, MAC MSF Natural in Medium, Korres Monoi Oil Bronzer in Sun Glow, Bare Escentuals All Over Colour in Faux Tan to contour, Illamasqua Powdered Metal in Thalia on tops of cheeknones.
Eyes: MAC Paint Pot in Bare Study, Korres Shimmering Eyeshadow in Light Purple all over lid, Illamasqua Pigment in Static over that, MAC Print eyeshadow in outer corners and in crease, GOSH Extreme Art Liner in 25 (Steel Grey), Korres Eyeliner pencil in 12 along waterline, Bourjois eyeshadow in Blanc Diaphane in tearducts, Revlon Fantasy Lengths false eyelashes in Natural, Loreal Voluminous Mascara in Carbon Black.

Lips: Barry M Lip Paint in 100, Illamasqua Sheer Lipgloss in Electrify.

I absolutely love the gorgeous sheen the Illamasqua powdered metal gives to the cheekbones. I would only wear this at night time for a more dramatic look though. I persevered with the falsies and finally got them to work...the Revlon self adhesive ones are really easy to use. If a falsie dunce like me can apply them, then anyone can! I am glad I managed to pick up the lilac/pink iridescence of the Static pigment on the close up pic...it's stunning!

Wednesday, September 23, 2009

Illamasqua Splurge

I decided to have a little Friday splurge last week and I had seen a few Illamasqua products that have been raved about and had caught my magpie eye.Here's what I thought of each product...
1) Thalia Powdered Metal - I had seen Belle Du Jour raving about this product a while ago. Anything that's multi purpose, creates a glow and is metallic - I'm there in a flash! This gorgeous glistening powder didn't disappoint me at all. It would be amazing on the cheekbones as a bronzey highlight or even used wet as an eyeshadow. It's so smooth to apply and has an amazing sheen to it. The packaging means it is a bit messy to work with and I kinda wish they had adopted the same packaging for this as they did for the pigments (which features a stopper in the lid...genius). 2) Static Pigment - I saw Tali's rave about this on YouTube and also her post on her blog. As she had said, it's really hard to pick up the gorgeous iridescence of this product on camera but I did my best. It has hints of lilac and pink and has so many facets when the light hits it...it could be dusted over another eyeshadow to create a unique effect or applied wet to the lid for an intense effect that changes colour as you move. I love this and can't wait to play with it! Illamasqua have come up with a really different product here and that's what defines the brand.
3) Sheer Lipgloss in Soul - I have wanted to try this lipgloss for ages ever since it was released in the Illamasqua Sirens collection. I finally got my hands on it and I really love the colour, which is a really nice sheer gold. This put together with the Korres Golden Bronze eyeshadow in my last post would be a match made in heaven! I did find the applicator gets a bit messy but I can forgive that for such a nice gloss. It's thick enough to stay put but not too sticky.
4) Sheer Lipgloss in Electrify - This gloss looks pretty bright in the tube but when applied it comes out as a really nice bubblegum pink with a slight metallic sheen to it. As before the formula is good and stays put for a reasonable amount of time. I tried it over YSL Rouge Volupte in Lingerie Pink and it looked so pretty!
5) Intense Lipgloss in Galactic - Now this is the one that has been a bit controversial in the blog world...I think you either love it or hate it to be honest. And I can say that I...LOVE IT! It looks really weird and scary in the tube coz let's be honest, it's like liquid foil. But when you apply it in a light layer over lipstick, it transforms the colour by giving it a metallic effect. I know it's not for everyone but I personally love this...it's what makes Illamasqua more daring than other makeup brands and you have to salute them for that. They should have named it Ga Ga after the lady herself coz it reminds me of her.
I plan on buying some more products come payday so keep your eyes peeled for that.
I have done a swatch below of the Electrify and Galactic glosses mixed together...see, not scary at all.
Have you tried any of these products?

Korres Blushes and Shimmering Eyeshadows

Hi Girlies! I was so so so excited to receive some Korres goodies in the post yesterday! They have kindly sent me two of their blushes and 4 of their shimmering eyeshadows. As you know, I have been involved in a passionate love affair with Korres ever since I bought their Monoi Oil Bronzer a few weeks ago. I love thier products and I love the fact that they are all natural. As much as I like elaborate, colourful packaging, I really like that Korres have kept it simple and practical. The product inside these compacts doesn't need any kind of fancy packaging because the products speak for themselves.
Look at these amazing blushes! I was sent Pink and Peach and as you will see from the pics above, the Pink one has a matte look to it, whereas the Peach has a slight shimmer. Note that there isn't even a tiny sign of 'glitter'...just the finest of shimmer...love it! I had seen Tali talking about Korres blushes and I can see why she loved them so much.

The pigmentation is perfect for my skin colouring. The Peach is just stunning with teeny tiny gold reflects that give a gleam to the skin. The Pink on the other hand gives a more subtle matte effect to achieve a healthy glow. I am just starting to get really into Blush as a product and these shades are perfect for what I want to achieve...a subtle hint of fresh colour on my cheeks.
I was sent their shimmering eyeshadows in Gold, Light Purple, Golden Bronze and White and here's what I thought:
1) Gold - the palest gold shade with gorgeous super fine shimmer that would be absolutely perfect as an all over lid colour, a highlight on the browbone or as an amazing highlight on the cheekbones!
2) Light Purple - This is the most subtle of all the colours I was sent. I have been looking for a very cool toned light lilac for ages as this shade is brilliant for opening and brightening the eyes...I think I may have now found my HG for that category!
3) Golden Bronze - I thought I had died and gone to heaven when I saw this colour...it's truly amazing and soooo mega pigmented...I can't explain how gorgeous it is!If you love bronze eyeshadows then you HAVE to get this. It's super smooth, super shimmery and metallic and blends like a dream...just look at the swatch below to see what I mean...
4)White - This eyeshadow despite the name, isn't white, it's a very pale silver and I love it. It is also highly pigmented and just plain gorgeous. I can imagine using it everywhere, from a light dusting on the cheekbones for a lovely gleam, to a base or highlight to a smokey eye...
I never would have looked to a natural brand for amazing eyeshadows but Korres has just blown me away. My favourite of the eyeshadows has to be the Golden Bronze one...Tali, you would LOVE this if you don't already have it! In fact, you would love all of them. Everyone needs these kind of quality eyeshadows that are soft, smooth and shimmery as hell. The camera doesn't even do these justice...you have to see them with your own eyes.

Tuesday, September 22, 2009

Search for HG undereye concealer...

Hey girls!

I just wanted to do a post on undereye concealers and take a poll on which one gets your vote? My current favourite concealer to cover up my dark circles is the Korres one I have talked loads about recently. Although this product does an amazing job of concealing, it doesn't COMPLETELY erase the darkness under my eyes that I inherited from my mum. I have deep set eyes, which is good in the regard that I don't have to do alot of shading and contouring in the eye area to create intense looks as the shadows are already there naturally. However, it's bad in the regard that I can't wear eyeliner on my lower lashline or I look like I haven't slept for weeks! This kind of limits what looks I can experiment with.

I am waiting for a package from Michelle a.k.a LipstickRules that contains MUFE and Lise Watier concealers that I am hoping will end my search. I'm always curious to hear what you guys think of the likes of Bobbi Brown and Laura Mercier concealers though as alot of people rave about these. I've almost bought the Laura Mercier one a few times but the price put me off (says she who buys lipsticks for £20!!ha ha).

Also, I wanted to know whether you all apply concealer before or after your foundation? Everyone seems to do it differently. I personally like to apply it after foundation as otherwise I feel like I'm wiping away my hard work when I apply something over the concealer. I am open to any other techniques you use.

I learnt a neat trick from Kandee The Makeup Artist where you basically apply your concealer in a triangle shape (the tip pointing down towards the cheek) to draw the eye downwards and therefore take the focus away from your dark circles. I know alot of people apply salmon coloured corrective concealer under their eyes too to counteract the blue/purple colour. This is basically the bain of my life and I won't rest until I find a solution!

Monday, September 21, 2009

Illamasqua Rich Liquid Foundation

I wanted to do a review on this foundation that I sent by Illamasqua. I am so so fussy about my foundation and unless it's perfect then I just can't use it. I always think that if your skin looks good then chances are the rest of your makeup will look great too so it's important to get a good base.

Everyone has different priorities and preferences when it comes to foundation so I wanted to let you know what mine are so you have all the information whilst reading my review. I like my foundation to have medium/medium to high coverage, I prefer liquid formulas, I like it to feel light on my skin and last at least 8 or 9 hours. I also like my foundations to be oil free and non-transfer.

The Illamasqua website says this foundation will "Lock away your inhibitions and bring your confidence to the fore. Loved by professional make-up artists, Illamasqua Rich Liquid Foundation provides maximum, long-lasting coverage without feeling or looking heavy. It blends easily and hides problem areas perfectly. Create your canvas, then paint your work of art".

When I squirted the foundation out onto my finger (I always apply it with my fingers), I noticed how thick the formulation was. I mean it's thicker than Revlon Colourstay and that tends to be too thick for some people. When I applied it, I would say that it's slightly easier to blend than Revlon Colourstay though and it blended in pretty well. I did kinda feel that it was a bit heavy though but I think I used a little bit too much, a little goes a LONG way with this product! It creates a flawless finish and given that it's a maximum coverage product, you would expect that anyway. It gave so much coverage that I didn't have to use any concealer at all. The shade I was sent was a little bit too light in colour for me so it paled me out a bit. It did last the whole day (I would say a good 12 hours) and didn't need to be touched up at all.

I will warn you now that if you don't like the consistency of Revlon Colourstay or the likes of MAC Studio Fix then you will hate this. This product is for people who really want a whole lot of coverage for whatever reason. I can see why they say that makeup artists like this foundation as it would be perfect for a photoshoot or music video when you need someone's skin to be completely flawless for hours on end. I would say that it's much too heavy for daytime and the only time I would consider using it would be if I was going out dancing or something. I like foundation to give a slightly matte effect but this was opaque matte. I didn't hate the foundation but I didn't love it either. It just felt too heavy for me. We all know that the HG foundation would be one that gives enough coverage whilst feeling light as a feather. My search continues...

Sunday, September 20, 2009

Front Cover True Colours Perfect Nude Palette

As promised, here's a full detailed review on the Front Cover True Colours Perfect Nude Palette. This is a brand that I hadn't heard much about before trying this product but as soon as the palette arrived in the post, I was blown away by the packaging idea. Basically the brand fuses fashion and makeup together (a match made in heaven!) and the palette has been designed to look like the front cover of a magazine which I think is a brilliant design concept. The thing that really makes it stand out is the lid, which is holographic! When you tilt the palette the image on the lid changes e.g. the model's eyes close and the text on the palette changes) . I have taken two photos of the lid to try and demonstrate what I mean...it's just the coolest thing ever!When you first pick up the palette, you notice that it weighs a ton compared to other palettes on the market, but then again, you are getting alot of product for your money. The palette contains two sections, the top one contains 8 eyeshadows and the bottom drawer contains 8 lipglosses.Some of the eyeshadow pans have a gorgeous embossed motif on them...I almost didn't want to disturb it coz it was so prettty! These had a texture that I am unfamiliar with but I loved the effect they gave. The only thing I can liken it to is a suede effect, they are velvety smooth and give a subtle matte finish. The eyeshadow pans without a motif offered more of a subtle shimmer that wasn't too over the top for daytime. I love the colours of the eyeshadows...from beige/brown/taupe/slate, all the shadows work together really well to create a natural look (as seen in my previous post). The applicator supplied is also of really good quality (natural bristles) and I used that to apply it for the FOTD. The swatches don't really do the colours any justice as the one that looks green in the top row is more of a grey in real life. You really have to see this palette to appreciate how gorgeous it is.The lipglosses were all shades that I would happily wear, bar one (the red shade on the far right, top row). The first 2 shades on the top row are very irridescent and a bit blah. My interest was more in the bottom row as those lipglosses all have tiny gold flecks in them and are all variations of nudes...I especially love the baby pink colour on the right! They are all gorgeous neutral shades that work really well over most lipsticks.These are swatches of the top row of glosses...I think the red shade is pretty wearable My favourites...look how gorgeous they are!
The palette is available from 1st October in larger Boots stores and I was amazed to find out that it's only £15! I think it's really good value for money as you could take this with you if you were going away for a weekend and it would contain half of your makeup you would need. The palette even has makeup artist tips on the back detailing how to apply the products. The only downside to this palette (and this is a very small point) is that I wish the pans had names as it would make it easier to make reference to them when doing FOTD's with it. I also think that giving the colours names just draws people in more and I know that personally, I would prefer to use something with a name like 'Smoke Cloud' than something boring like 'Grey'. They could even have named the shades with a fashion twist like 'Stiletto' or 'Catwalk'.

Let me know what you think of the palette

FOTD using Front Cover palette

This FOTD was to try out a Front Cover palette that I was sent and also to try out the Illamasqua Rich Liquid Foundation I received.
It's a really neutral look and I used brown liquid eyeliner for a slightly more subtle look, complete with my trademark flicks!...I can't help myself, it's a staple look for me.
Here's what I used:

1) Illamasqua Rich Liquid Foundation (the shade was too light for me and I think it makes me look a bit pale!)
2) Benefit Erase Paste in no.2
3) MAC MSF Natural in Medium
4) Prestige SLM in Rich Bronze (all over face)
5) Bare Escentuals All Over Colour in Faux Tan (to contour)
6) Benefit High Beam
7) MAC Paint Pot In Bare Study (used as a base)
8) MAC eyeshadow in All That Glitters (used in inner corners of eyes)
9) ELF Liquid Eyeliner in Coffee
10) Clarins Eyebrow Pencil in Blonde
11) Lancome Cils Booster
12) Loreal Voluminous Mascara in Carbon Black
I used a mixture of the eyeshadows from the Front Cover palette Here's the Front Cover eyeshadow/lipgloss palette that I will be swatching and reviewing in my next post...
I will also do a post on the Illamasqua foundation that I used for this look.
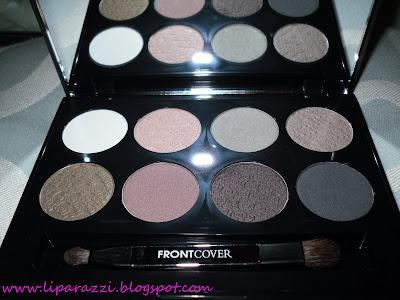
The eyeshadows don't have names so bear with me...I used the white shade above all over the lid up to the browbone, then the beige shade next to that on top (only on lid), the light grey shade next to that in the outer corners and in the crease then I used the darkest shade on the bottom row right to darken the outer edges


I used a mixture of the bottom far left lipgloss with the shade third from the left.

I will go into this palette in more detail in my next post though.

Saturday, September 19, 2009

Korres Wild Rose Foundation

As you know I was sent the Wild Rose Brightening Longlasting Foundation, Concealer and Powder to try out recently. I finally got a chance to use the foundation today and here's what I thought of it...

Korres describe this product as "a natural, antiaging foundation formulated with Wild Rose extract, a potent source of vitamin C. Wild Rose extract is clinically proven to repair fine lines and wrinkles and brighten uneven skintone. A micro-patch of natural polymers with regenerating properties provides long-lasting moisturization and is clinically proven to extend the wear of the foundation. This brand favorite contains an oil-free, dermatolically tested formula that imparts a natural swash of color and a smooth, velvety finish".I am really fussy when it comes to foundation as I am unlucky in the skintone department in that I naturally have really rosy cheeks so I need a foundation with good coverage to disguise it to an extent. I won't use a foundation with less than medium to full coverage as this is what I feel most comfortable using and it has always worked for me. I always get a bit nervous using a new foundation if I'm going out in case it turns out to be rubbish but I wasn't doing a whole lot today so thought it would be a perfect time to try it out. I was sent the WRF4 shade which luckily match my skintone pretty well when I have a slight tan (which I do today, thanks to Xen Tan!). It would probably be a little dark for my natural skintone though.

So first up, I thought that the foundation was easy to apply and blend, it's definitely a thinner consistency than my usual foundation, Revlon Colourstay which can be really thick at times. It blended into my skin seamlessly and created a nice even, velvety base for my makeup. I would say the coverage is medium as it didn't cover the redness in my face as much as I would like. However, the foundation did have a brightening effect, meaning that my skin looked dewy and radiant rather than caked in makeup. You can see this from the FOTD in my previous post. The foundation has lasted well through the day and I really like the illuminating effect it has. The fact that it contains so many skin loving ingredients makes it even better.I wouldn't say this is my HG foundation as I think I would only wear this on lazy weekend day when I'm shopping or something rather than wearing it on a night out when I need alot more coverage. So, in essence, this product is great for someone who has a relatively even skintone and usually wears a medium coverage foundation. I would really recommend this foundation if that's what you're looking for. I will continue to wear this to work etc but I will still be relying on Revlon Colorstay to give me the coverage I need for a big night out.

I'm hoping to buy some Bobbi Brown foundation next week and I need some advice on ones that offer good coverage (i.e. medium to high coverage). I have had a look at the Oil Free liquid one and the foundation stick but I'm unsure which one to go for. If you have used either, let me know!

FOTD using new Korres products

Face: Korres Wild Rose Foundation in shade WRF4, Korres Wild Rose Concealer in shade WRC2 under eyes, Estee Lauder Disappear Concealer in Light for any redness around nose/blemishes, Korres Wild Rose Powder in shade WRP3 to set, Korres Monoi Oil Bronzer in Sunglow all over face, Bare Escentuals Faux Tan to contour, MAC Cream Colour Base in Shell on tops of cheekbones and cupid's bow. Eyes: Benefit Creaselss Cream Eyeshadow in RSVP all over lid as a base, ELF Mineral Eyeshadow in Natural all over lid, MAC Woodwinked in crease and outer edges of lid, Urban Decay Half Baked Eyeshadow in inner corners, Urban Decay 24/7 eyeliner in Bourbon applied thickly along top lashline, MAC Pearlglide eyeliner in Black Russian applied very close to lashline to add depth, 17 eyeshadow in Ivory Coast on browbone, Lancome Cils Booster, Loreal Voluminous mascara in Carbon Black. Lips: MAC Creme De Nude lipstick, Bourjois 3D Effect liplgoss in Beige Elastic.

As you can see, I've gone Korres crazy lately and I love using their products. I wanted to show how natural the bronzer looks, it's just gorgeous. Ans as you can see in the pics, the Korres concealer really covers my dark circles. I will do a review on the foundation I used for this FOTD in my next post so look out for that.


Friday, September 18, 2009

Cosmetics: Animal Testing

A bit of a serious post today because I have seen this crop up quite a bit on YouTube lately. This is such a controversial subject in the makeup world as some people don't have a problem with cosmetics being tested on animals and other people find it abhorrent. I personally don't agree with it and wherever possible I try and buy products that haven't been tested on animals.

However, I have recently found out that Loreal test on animals and that really disappointed me as I own some of their products and that made me feel really guilty. The EU are currently phasing out animal testing and the French brand, Loreal, are apparently opposing this, which really shocks me. There's so many grey areas with this e.g. Lancome don't test on animals, however, they own Loreal who DO test on animals...so I really don't understand why they don't just stop completely because Lancome are still funding it at the end of the day. As you may know, this kind of testing has been banned in the UK thankfully so British brands are subject to this law. What I will say is that I don't think it's right, in this modern day and age, that we are still subjecting animals to that kind of cruelty. You will have noticed that I use alot of natural and organic products because, in my mind, if more companies used more of these kind of organic ingredients, then there would be no need to test man-made chemicals on animals anymore.

This post is not about me getting on my high horse and saying that I've never used a product that's been tested on animals because I know I have. I don't feel good about that and I can certainly say that to the best of my ability, I do try to choose products from ranges that don't carry out that kind of research (such as Barry M or Liz Earle). I mean, as much as I adore cosmetics, they are not vital to survival and they are, at the end of the day, a luxury product. I, for one, don't want any animal to suffer just so I can look good. That would be the most awful form of vanity.

What are your thoughts on this subject?

Brightening Highlights

Sometimes, between hairdresser appointments, I feel like my highlights need a bit of a lift as they start to look a bit dull. You know how it is, your hair gradually loses it's glossy colour so I'm always on the look out for brightening or clarifying hair product to make my blonde hair look as good as it can. I was sent a new product from the lovely people at Louise Galvin and that product was Sacred Locks Vitox Hair Brightener. I liked the fact that the product contains no SLS, Parabens, Silicone,Petrochemicals, Synthetic Fragrance or Polymers which in turn means that it's a great nautral and gentle way to get your hair looking gorgeous.
This product claims to be a "pioneering Vitamin C hair de- tox to brighten highlights that are looking lacklustre and strip away environmental or product build up. This gentle Vitamin C formulation is a natural highlight brightener to restore shine and clarity to your hair. A unique two-pack chemistry that naturally aids oxygen and vitamin uptake whilst providing a perfect platform for successful colour treatment". I really liked the sound of a product that could revitalise your hair in a gentle way as my fine hair just won't tolerate any harsh products! This kit costs £25.00 and for that you get 3 treatments. I thought this sounded quite expensive but then I saw the results...

The kit you get consists of three vials of Vitox solution and 3 jars of Vitox powder. You mix one of each together for each treatment and shake it gently until it's a foam consistency. You wet your hair, towel dry and then apply the product and leave to develop for 3 minutes. You then rinse the formula out of your hair and shampoo/condition as normal. The idea of only mixing the formula when you need it is because apparently the Vitamin C only remains effective for a short period once it's mixed with solution.

I noticed a real difference in my hair after using this treatment. My blonde highlights looked totally refreshed and alot brighter and my hair definitely had alot of bounce to it. This is a great treatment to use just before a night out or special occasion, if you feel like your hair needs a lift and can't make it to a salon to get it coloured. They also recommend it for post holiday hair (i.e. too much chlorine from the pool has turned your hair a lovely khaki colour!).

This was really easy to use and a must for anyone with blonde or highlighted hair!

Thursday, September 17, 2009

Korres Wild Rose Concealer and Powder

I was sent the Korres Foundation, Concealer and Powder from the Wild Rose collection to try. I haven't tried the foundation yet (will be testing that out this weekend) but this is what I thought of the concealer and powder...Korres describes this concealer (£18.50) as providing "high coverage of eye area imperfections, such as dark circles, capillaries, blemishes and sunspots. Contains Wild Rose and vitamins C and E to add radiance, moisturize and provide antioxidant benefits". I am always searching for good under eye concealers as I have dark circles that are hereditory so no matter how much sleep I get, they are always there to some degree. I was sent the WRC2 shade.

This concealer pen has a small brush tip and you dispense the product by twisting the other end. I found that I didn't need alot of product as it's a lovely consistency that blends in really well. I would say it's a bit thicker than the likes of YSL Touche Eclat but it provides ALOT more coverage than that product! It's cheaper and a million times better than Touche Eclat in my opinion. I would totally agree that it concealed my dark circles extremely well and brightened the whole eye area.

It lasted all day long after I had set it with powder and my eyes still looked fresh when I got in from work in the evening. This product really impressed me and I love the fact that it feels so light, as no one wants cakey concealer under their eyes! This is one of the best concealers I have tried and it has better staying power than most (Benefit Erase Paste SOMETIMES feels like it has slid off a little by the end of the day). This concealer dried to the touch without feeling like it was drying out my skin. I would highly recommend this!

Next up is the Korres Wild Rose Powder in shade WRP3 (£19.50) which is described as a "velvety powder, enriched with a botanical blend for a soft, luminous finish. Wild Rose, a natural source of vitamin C, works to repair fine lines and brighten uneven skin tone". This powder is marketed as a brightening/flawless finish and I'm all about that so I was really looking forward to seeing the results.
The compact has a really nice design where the powder layer flips up to reveal a compartment for the sponge applicator. I'm not normally a fan of these kind of applicators but this one is nice and soft so I didn't mind it too much. I would probably prefer to apply it with a kabuki or powder brush though.

I applied the powder after my foundation and concealer with the sponge and I was really pleased with the result. The powder is really finely milled, silky smooth and mattified my face without looking too powdery. It doesn't give the same effect as MAC MSF Natural as that offers a more luminous, glowy effect. This powder is perfect for getting that matte flawless effect that I often crave when I am going out and want to avoid the shiny look. It set my makeup beautifully and looks really natural.
I am loving Korres makeup at the moment. I now wear their concealer, powder and bronzer and I can't fault any of them. I'm looking forward to testing their foundation as I am super fussy about foundations!
Have you tried any of these products yet and what did you think?


Nails: DIY or Salon?

I just wanted to get some feedback from you girls on whether you do your own nails at home or go to a salon to get them done professionally? I have always had good strong nails that grow really fast so luckily I've never had a need to get acrylics or gels or anything. As you can see from the pic on the right, I like my nails to be either french manicure or with a pale pink polish (pic is from my engagement party photos hence the ring...I swear it was the only proper pic I had of my nails just in case you think I'm shamelessly showing off!ha ha). You'll have to excuse my freakishly long fingers...I hate them!

I always seem to stick to light/pale nail polishes on my hands because a) It shows less when they chip and chipped nails are a pet hate of mine and b) I think it looks more 'clean'...if that makes sense? I sometimes try bright colours on my nails but as soon as I see a tiny chip, I have to remove it all straight away...obsessive much? What can I say, I'm a perfectionist and sometimes, I can't control it!ha ha

I always just do my own nails and with all the practice I've had over the years, I have become really good at it. Also, with the Kiss white nail tip pen I bought a while ago, doing a french manicure on myself is easy peasy. I buff and smooth my nails once a week, file them regularly and use hand cream almost every day so I have never seen the need to go to a salon and pay someone else to do it for me. Maybe that makes me cheap, but I would rather buy myself a new nail polish that will last me ages than use the money to go to a salon and get a couple of coats applied for the same price or more.

Shockingly, even though I'm a real girl's girl, I've only ever had a professional manicure once or twice in my life and I've never had a professional pedicure (don't like people touching my feet!)However, I do get the whole 'pampering' thing and I like to be treated just as much as the next girl. But with everyone's finances hitting hard times, I really don't like to pay for something I can do just as well myself. I have started to wonder though...am I missing out on something? I also do my own pedicures but I would quite like to see how that would compare to a professional pedicure...you will have to enlighten me as to whether it's worth it...

Wednesday, September 16, 2009

Benefit Creaseless Cream Eyeshadow in RSVP

I am seriously in love with this cream eyeshadow! I now own 5 of them (Strut, RSVP, Skinny Jeans, Birthday Suit and Tattle Tale). I can't get enough of them! RSVP is my favourite though, it's the perfect neutral eyeshadow base for me and it's so creamy in texture, it applies so effortlessly (I love Skinny Jeans for a more dramatic look though). These cream eyeshadows are immense coz they never crease or wear off and they really do last all day.

I really like the the cute packaging too...this is an important element to makeup as well coz if it didn't look so pretty, I wouldn't lust after it so much (shallow but true!)

Just look at the swatch on the right...so gorgeous, just the right amount of shimmer. It's such a universally flattering colour that i would go as far as to say that it would look good on anyone! You can apply it sheer or build up the colour to make it more opaque. This is definitely a product that I will be using on a daily basis as something you can really rely on.

Have you tried these yet and if so, which one gets your vote?